March 18, 2026
Landscape Concept – 24-Jun-2020
Mom’s Unstuffed Cabbage Rolls
This recipe is one of my mother’s favorites for pot luck meals. All of the goodness of stuffed cabbage rolls without the extra work of making the rolls. Plus, everything can be prepared in one deep pan on the stove top.
There is a lot of room for personalizing this dish. I like a little more tomato flavor to mine, so I add one can of tomato paste. For those who like rice in their cabbage rolls, rice can be added. For uncooked long grain rice, increase the liquid by two cups (water, vegetable or beef stock), and add one cup rice once the everything has reached a boil. The rice will absorb most of the liquid give the dish more body.
Ingredients
1½ to 2 pounds lean ground beef
1 tablespoon oil
1 large onion, chopped
1 clove garlic, minced
1 small cabbage, chopped
2 cans (14.5 ounces each) diced tomatoes
1 can (8 ounces) tomato sauce
½ cup water
2 teaspoon ground black pepper
1 teaspoon sea salt
½ teaspoon cayenne pepper (optional)
½ teaspoon crushed red pepper (optional)
Preparation
- In a large skillet, heat olive oil over medium heat. Add the ground beef and onion and cook, stirring, until ground beef is no longer pink and onion is tender.
- Add the garlic and continue cooking for 1 minute.
- Add the tomatoes, tomato sauce, seasonings, and cabbage. Bring to a boil.
- Cover and reduce to simmer, stirring occasionally, for 20 to 30 minutes or until cabbage is tender.
Note:Adjust seasoning to taste while simmering.
Cranberry Sauce
This cranberry sauce is best when made with fresh or frozen cranberries, but in a pinch whole canned cranberries can be used. The canned cranberries are usually in sugar, so substitute 2 cans of cranberries for 4 cups cranberries plus sugar.
Ingredients
4 cups fresh or frozen cranberries (12 oz package)
1 cup sugar
zest and juice of one large orange (⅜ cup juice)
½ cup water
whole stick cinnamon
Directions
- Combine water and juice with sugar in medium saucepan. Stir to dissolve sugar and bring to a boil over medium heat.
- While syrup is heating, wash fresh cranberries in colander under running water. Remove any stems.
- After syrup comes to boil, add cranberries. Return to boil.
- Reduce heat to simmer/slow boil, add orange zest and cinnamon stick.
- Stir occasionally, waiting for cranberries to burst.
- Remove from heat, remove cinnamon stick. Sauce will thicken as it cools.
Barb’s Potatoes
Simple potato casserole recipe with a lot of flavor.
Ingredients
1 bag (32 oz) frozen hash brown potatoes, shredded
16 oz sour cream
1 can cream of mushroom soup (condensed)
½ package Lipton onion soup mix
2 cups cheddar cheese
1 cup unsalted butter (2 sticks)
1½ cups corn flakes
Preheat Oven: 350°F
Directions
- Remove hash brown potatoes from freezer to let thaw slightly in bag.
- Melt ½ cup (1 stick) butter in microwave safe bowl. Combine with sour cream, soup, and soup mix; mix well. Add cheddar cheese; stir to combine.
- Prepare 9x13x2″ pan with non-stick spray (or butter). Spread hash brown potatoes in pan. Evenly spread sour cream, soup, and cheese mixture over top.
- Melt 1/2 cup (1 stick) of butter in microwave. Add corn flakes to butter and stir until butter is absorbed.
- Sprinkle corn flakes evenly over top of sour cream mixture in pan.
- Bake for one hour in 350°F oven.
Italian Cream Cake with Fluffy Frosting
This cake recipe was adapted from the KitchenAid mixer recipe book. Instead of the traditional cream cheese frosting, I opted to use the fluffy frosting.
Ingredients
Italian Cream Cake
5 eggs, separated
½ cup butter
½ cup shortening
1¾ cup sugar
2 cups all-purpose flour
1 teaspoon baking soda
1 cup buttermilk
1 teaspoon vanilla extract
2 cups coconut
1 cup chopped pecans
Fluffy Frosting
1½ cups sugar
½ teaspoon cream of tartar
½ teaspoon salt
½ cup water
1½ tablespoons light corn syrup
2 egg whites
1½ teaspoons vanilla
Preheat Oven: 350°F
Cake Directions
- Place egg whites in mixer bowl. Using wire whip, whip until egg whites are stiff but not dry. Set aside egg whites in another bowl.
- Place butter, shortening, and sugar in mixer bowl. Using flat beater, mix until light and fluffy. Continue mixing, add egg yolks one at a time, mix thoroughly. Stop and scrape bowl.
- Mix flour and baking soda. Add half to sugar mixture, and mix to combine. Add buttermilk, vanilla, and remaining flour mixture. Beat to combine.
- Add coconut and pecans. Mix at slowest speed until just blended.
- Using spatula, gently fold in egg whites.
- Pour batter into greased and floured 13x9x2″ baking pan. Bake at 350°F for 40 to 50 minutes, until toothpick inserted in center comes out clean.
- Cool completely on wire rack before frosting.
Frosting Directions
- Place sugar, cream of tartar, salt, water, and corn syrup in saucepan. Cook and stir over medium heat until sugar is completely dissolved, forming a syrup.
- Place egg whites in mixer bowl. Using wire whip, whip on high until egg whites begin to hold shape.
- Continue on high, slowly pour hot syrup into egg whites in a fine stream and whip 1½ to 2 minutes.
- Add vanilla, continue whipping about 5 minutes, or until frosting loses its gloss and stands in stiff peaks.
- Use immediately to frost cake.
Note: For best flavor, chill cake in refrigerator overnight before serving.
pcDuino U-Boot – Part 3
In Part 1 and Part 2 of this series of posts I outlined the attempts I have made at using U-Boot to control the booting of the pcDuino. Specifically, I have been trying to configure the second stage boot to be from my SD card instead of the on board NAND flash. Unfortunately, the U-Boot implementation as installed does not allow persistent setting of the environment for boot from an alternative interface. And the installed U-Boot does not support the newer boot.scr or uEnv.txt extensions. The newer U-Boot versions available on linux-sunxi are not compatible with the pcDuino. I also tried the fw_printenv and fw_setenv U-Boot tools, but they only work with /dev/mtdX NAND configurations. I was not able to find a ready made solution, so I had to roll my own. Read More
pcDuino U-Boot – Part 2
In Part 1 I described connecting to the pcDuino serial port and accessing the U-Boot subsystem. With this access to the boot environment, the task of booting to a root file system other than the NAND flash looked promising. Read More
pcDuino U-Boot – Part 1
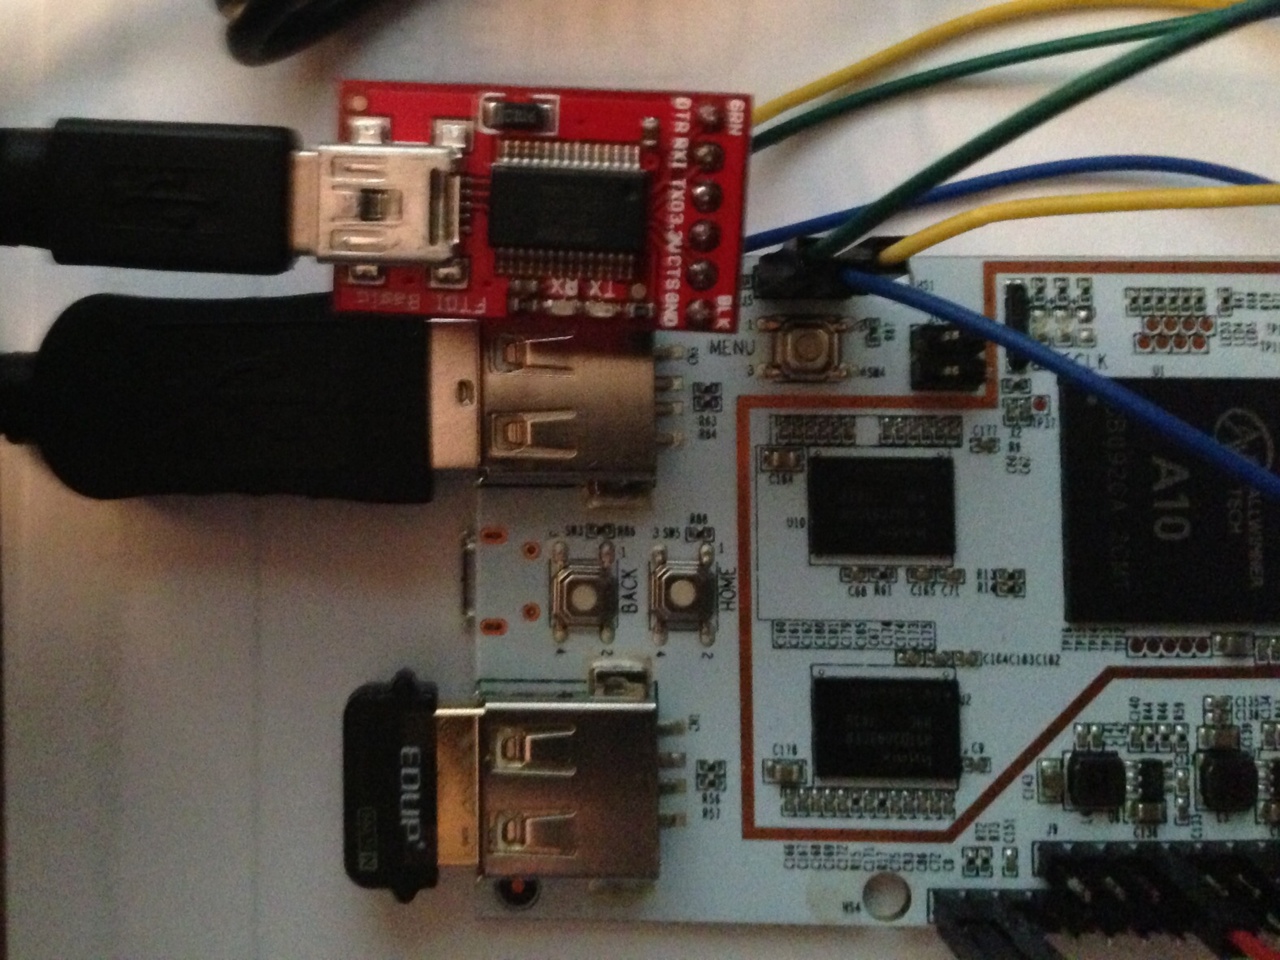
This evening I decided it was time to check out the boot loader and boot command options on the pcDuino. To access the serial port on the J5 debug port I used a Sparkfun FTDI Basic Breakout-3.3v — a simple to use logic level serial to USB interface. With the power off and the FTDI Basic disconnected from the computer, I connected the serial lines and ground.
Read More