July 2, 2025
pcDuino U-Boot – Part 1
Posted on 12-Mar-2013, Tuesday | in Computers, pcDuino | by BillThis evening I decided it was time to check out the boot loader and boot command options on the pcDuino. To access the serial port on the J5 debug port I used a Sparkfun FTDI Basic Breakout-3.3v — a simple to use logic level serial to USB interface. With the power off and the FTDI Basic disconnected from the computer, I connected the serial lines and ground.
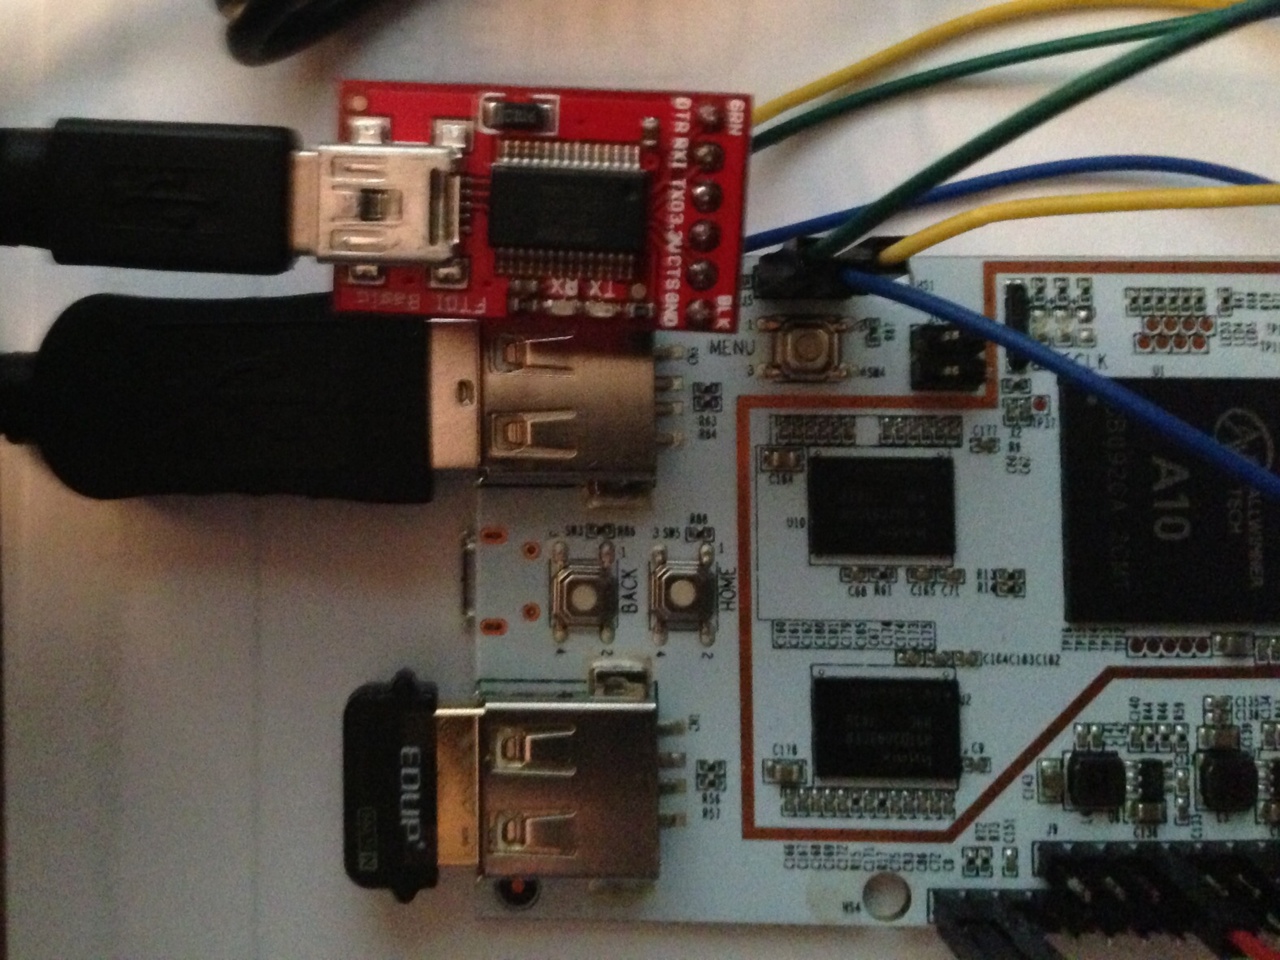
Connections
| pcDuiono J5 Pin | FTDI Basic | Description |
| 1 – RX | 3 – TXO | pcDuino to FTDI serial data |
| 2 – GND | 6 – GND | common signal reference |
| 3 – TX | 2 – RXI | FTDI to pcDuino serial data |
After double checking the connections, I plugged the FTDI Basic into my Windows laptop computer. After confirming the port assignment, I used TeraTerm to open the serial port on my computer. The serial communication configuration needed to be set for 115200 Baud, 8-bit, No parity, 1 stop bit, no flow control, and the serial port assigned by Windows to the FTDI Basic.
Power On and Boot
After applying power to the pcDuino, the bootloader (U-Boot) startup sequence showed in the terminal window, followed by the familiar Linux boot messages as the kernel was loaded and Linux started. Surprisingly, at the end of the Linux boot, I was presented with a root prompt. Instead of presenting a login prompt, the debug port goes directly to a root shell. This I will need to change!
|
1 2 3 4 5 6 7 8 9 10 11 12 13 14 15 16 17 18 19 20 21 22 |
[ 12.776652] Freeing init memory: 5108K /dev/nandd e2fsck 1.42.7 (21-Jan-2013) /dev/nandd: clean, 60026/96000 files, 314839/384000 blocks [ 12.837041] EXT3-fs (nandd): using internal journal [ 12.842051] kjournald starting. Commit interval 5 seconds [ 12.847559] EXT3-fs (nandd): mounted filesystem with ordered data mode [ 13.098102] set to DVI mode [ 13.101848] get_hdmi_mode == DVI [ 13.140992] hostname used greatest stack depth: 5648 bytes left [ 13.200950] hwclock used greatest stack depth: 5592 bytes left [ 13.253305] plymouthd used greatest stack depth: 5208 bytes left [ 13.262105] init: ureadahead main process (71) terminated with status 5 [ 13.685501] df used greatest stack depth: 5168 bytes left [ 13.708732] grep used greatest stack depth: 4960 bytes left * Starting NTP server ntpd Welcome to Linaro 12.11 (GNU/Linux 3.0.8+ armv7l) * Documentation: https://wiki.linaro.org/ [ OK ] [ 20.106130] android_usb: already disabled root@ubuntu:~# |
U-Boot Fun
Now for the real reason I wanted to try this. Access to U-Boot and the boot command line.
In the serial terminal window, I rebooted the pcDuino…
|
1 2 3 4 5 6 7 8 9 10 11 12 13 14 15 16 17 |
root@ubuntu:~# shutdown -r now root@ubuntu:~# Broadcast message from root@ubuntu (/dev/ttyS0) at 19:14 ... The system is going down for reboot NOW! * Asking all remaining processes to terminate... [ OK ] * All processes ended within 1 seconds.... [ OK ] nm-dispatcher.action: Caught signal 15, shutting down... nm-dispatcher.action: Disconnected from the system bus, exiting. * Deconfiguring network interfaces... [ OK ] * Unmounting temporary filesystems... [ OK ] * Deactivating swap... [ OK ] * Unmounting local filesystems... [ OK ] umount: /run/lock: not mounted * Will now restart [ 631.725545] Restarting system. |
… and interrupted the U-Boot start up by pressing the space bar at the “Hit any key to stop autoboot” prompt.
|
1 2 3 4 5 6 7 8 9 10 11 12 13 14 15 16 17 18 19 20 21 22 23 24 25 26 27 28 29 30 31 32 33 34 35 36 37 38 39 40 41 42 43 44 45 46 47 48 49 50 51 52 53 54 55 56 57 58 59 60 61 62 63 64 65 |
HELLO! BOOT0 is starting! boot0 version : 1.5.0 dram size =1024 Succeed in opening nand flash. Succeed in reading Boot1 file head. The size of Boot1 is 0x00056000. The file stored in 0X00000000 of block 2 is perfect. Check is correct. Ready to disable icache. Succeed in loading Boot1. Jump to Boot1. [ 0.181] boot1 version : 1.5.0 [ 0.181] pmu type = 3 [ 0.182] bat vol = 0 [ 0.213] axi:ahb:apb=3:2:2 [ 0.213] set dcdc2=1400, clock=1008 successed [ 0.215] key [ 0.227] no key found [ 0.227] flash init start [ 0.239] flash init finish [ 0.241] fs init ok [ 0.242] fattype FAT16 [ 0.242] fs mount ok [ 0.247] script finish [ 0.249] power finish [ 0.257] BootMain start [ 0.257] 0 [ 0.272] usbdc_vol = 4000, usbdc_cur = 0 [ 0.272] usbpc_vol = 4000, usbpc_cur = 0 [ 0.275] init to usb pc [ 0.278] set pc [ 0.368] power_start=0x00000002 [ 0.368] pre sys mode [ 0.368] startup status = -1 [ 0.371] key value = 0 [ 0.374] unable to find recovery_key key_max value [ 0.382] test for multi os boot with display [ 1.006] show pic finish [ 1.006] load kernel start [ 1.024] load kernel successed [ 1.024] start address = 0x4a000000 [ 1.026] power exit detect [ U-Boot 2011.09-rc1-svn62 (Feb 01 2013 - 22:20:45) Allwinner Technology CPU: SUNXI Family Board: A10-EVB DRAM: 512 MiB NAND: 1900 MiB In: serial Out: serial Err: serial --------fastboot partitions-------- -total partitions:5- -name- -start- -size- bootloader : 1000000 2000000 env : 3000000 1000000 boot : 4000000 1000000 rootfs : 5000000 5dc00000 UDISK : 62c00000 14000000 ----------------------------------- no misc partition is found Hit any key to stop autoboot: 0 sunxi# |
Greeted by the U-Boot prompt. No to check for what commands are available for modifying the environment using the help command.
|
1 2 3 4 5 6 7 8 9 10 11 12 13 14 15 16 17 18 19 20 21 22 23 24 25 26 27 28 29 30 31 32 33 34 35 36 37 38 39 40 41 42 43 44 |
sunxi#help ? - alias for 'help' base - print or set address offset boot - boot default, i.e., run 'bootcmd' boota - boota - boot android bootimg from memory bootd - boot default, i.e., run 'bootcmd' bootm - boot application image from memory cmp - memory compare cp - memory copy crc32 - checksum calculation env - environment handling commands exit - exit script false - do nothing, unsuccessfully fastboot- fastboot- use USB Fastboot protocol fatdown - download data to a dos filesystem fatinfo - print information about filesystem fatload - load binary file from a dos filesystem fatls - list files in a directory (default /) go - start application at address 'addr' help - print command description/usage key_test- Test the key value and dump key registers loop - infinite loop on address range md - memory display mm - memory modify (auto-incrementing address) mmc - MMC sub system mmcinfo - display MMC info mtest - simple RAM read/write test mw - memory write (fill) nand - NAND sub-system nboot - boot from NAND device nm - memory modify (constant address) printenv- print environment variables reset - Perform RESET of the CPU run - run commands in an environment variable saveenv - save environment variables to persistent storage setenv - set environment variables showvar - print local hushshell variables sunxi_flash- sunxi_flash sub-system test - minimal test like /bin/sh true - do nothing, successfully version - print monitor, compiler and linker version sunxi# |
Current environment settings.
|
1 2 3 4 5 6 7 8 9 10 11 12 13 14 15 16 17 18 19 20 21 22 23 24 25 |
sunxi#env print boot_fastboot=fastboot boot_normal=fatload nand 0 0x48000000 uImage; bootm 0x48000000 boot_recovery=nand read 40007800 recovery;boota 40007800 bootargs=console=ttyS0,115200 root=/dev/nandd init=/init loglevel=8 rootfstype=ext4 rootwait bootcmd=run setargs load1 boot_normal bootdelay=3 console=ttyS0,115200 fastboot_key_value_max=0x8 fastboot_key_value_min=0x2 init=/init load1=fatload nand 0 43000000 evb.bin loglevel=8 mmc_root=/dev/mmcblk0p7 nand_root=/dev/nandd partitions=nanda@boot:nandb@rootfs:nandc@UDISK recovery_key_value_max=0x13 recovery_key_value_min=0x10 setargs=setenv bootargs console=${console} root=${nand_root} init=${init} loglevel=${loglevel} stderr=serial stdin=serial stdout=serial Environment size: 749/131068 bytes sunxi# |
Interesting. By default, the A10 settins are loaded to memory from evb.bin and the kernel is loaded from uImage from the NAND flash /boot partition. The default kernel command line sets /root to the NAND flash root partition. Then off it goes.
Next
My next project is to get the pcDuino booting from the SDCARD. All of the pieces are present for accomplishing this. Stay tuned for Part 2 later tonight. Right now, it is dinner time.
Update 14-Mar-2013: For those interested in Part 2 — where I planned on enabling automatic SD booting, there has been a delay. The U-Boot implementation on the pcDuino is crippled. It does not have the ability to save an updated environment to NAND flash and does not support the newer boot.scr or uEnv.txt files. I am currently in the process of creating a U-Boot for pcDuino that will support SD card booting without removing the NAND flash support.
WARNING
ONLY TRY THE ABOVE IF YOU UNDERSTAND WHAT YOU ARE DOING. Connecting to the serial debug port has the potential to damage your pcDuino if your connections are incorrect. Changes to the U-Boot environment can render your pcDuino unbootable. YOU HAVE BEEN WARNED!
Pingback: pcDuino U-Boot – Part 2- Enjoy!
Pingback: pcDuino U-Boot – Part 3- Enjoy!